
Configuring Database Monitoring

Database monitoring agent should not have this flag
-Dapplicare.alternateHWMonitoring=true
One JDBC URL per SID/Server
- Applicare Agent will capture the SQL's and metrics based on the SID for ORACLE and for MySQL, MSSQL and PostgreSQL it will be based on the server configured in the JDBC URL.
- The database name specified in the URL is only for syntax.
- If the server contains more then one database all the details will be captured under the single JDBC URL.
- For MSSQL monitoring the MSSQL server and the agent should run in the same machine.
Note:
Steps to replace the JDBC URL for the existing Standalone DB Agent.
1. Delete the agent from the Applicare console.
2. Bounce the Standalone DB Agent.
3. Add the agent with the new JDBC URL.
STEP 1:
Deploy StandAlone Agent for DB monitor
1. First, you will have to build the stand-alone agent. Once you install Applicare you can build the stand-alone agent by running
For Windows
<ApplicareServer Install Dir>/agent/Standalonecollector/build/ build_collector.bat
For Linux
<ApplicareServer Install Dir>/agent/Standalonecollector/build/ build_collector.sh

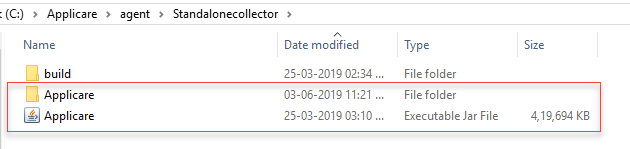
This will create a new folder,
<Applicare Server Install Dir>/agent/Standalonecollector/Applicare
and jar file,
<Applicare Install Dir>/agent/Standalonecollector/Applicare.jar
2. If you are going to deploy the agent in the new machine then copy the "Applicare.jar" from the Applicare server machine to agent machine and extract in any directory. (or) copy the Applicare folder and move it in the new machine.
Please make sure that on Linux environment you assign appropriate read/write permission to extracted/copied Applicare folder/jar. Additionally, run the following command from the extracted/copied folder to assign execute permission to all the .sh script files.
chmod +x *.sh
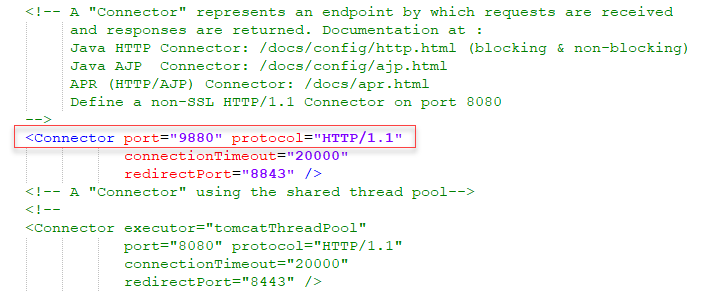
3. Please note that the agent by default runs on port 9880. You can change the port number by modifying
<ApplicareAgentHomeDir> /server/conf/server.xml file
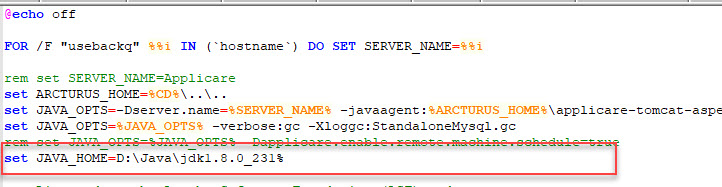
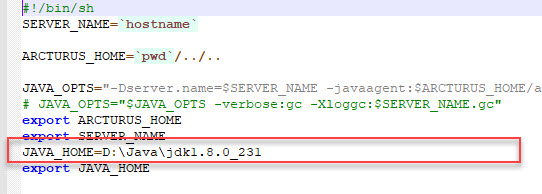
4. Set "SERVER_NAME" and "JAVA_HOME" property in the agent "Catalina.bat/sh" file before starting the agent.
Go to the path <ApplicareAgentHomeDir>/server/bin/catalina.bat/sh
Edit Catalina.bat/sh and set the "JAVA_HOME" and save the file.
JAVA_HOME - Java JDK path of the Agent machine.
For Windows edit Catalina.bat file and save
For Linux edit, Catalina.sh file and save
5. Open command prompt in administrator mode and start the agent by running startup.bat/sh file.
STEP 2:
Configuring DB Monitoring Permissions in Database side
MSSQL
Create a new user with SQL server authentication and assign "Sysadmin" permission.

MYSQL
Create a new user and assign a DBA role (Root level user permissions).

ORACLE
Create a new user and assign a DBA role (Root user permission).
Query:
SQL> create user applicare identified by pass123;
User created.
SQL> grant connect to applicare;
Grant succeeded.
SQL> grant connect,resource,dba to applicare;
Grant succeeded.
PostgreSQL - Restart is required


Or you can check the file path by executing the below query in the query window. It will display the file path.
Query: SHOW CONFIG_FILE

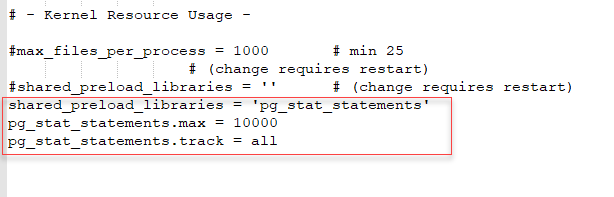
shared_preload_libraries = 'pg_stat_statements'
pg_stat_statements.max = 10000
pg_stat_statements.track = all
Please make sure the "listen_address" = '*' is enabled in the conf file under the "connection settings"

3. Save the file.
4. Configuration in the “pg_hba.config” file.
Add the needed IP addresses in the pg_hba.config” file under the local connections to communicate with the PostgreSQL.

5. Save the file.
6. Restart the PostgreSQL service.
7. Execute the below statement in the Postgres query window.
First, connect to the database which we are going to monitor using applicare using the command
Select the database which we are going to monitor
Using query window
- \c databaseName
- For example, if we are going to monitor "testdb" then the above command will be \c testdb
Using UI

Now execute the below command
- SELECT * FROM pg_available_extensions WHERE name = 'pg_stat_statements' and installed_version is not null;
If the result from the above statement is empty then execute the below statement otherwise don't execute the below one.
- CREATE EXTENSION pg_stat_statements;
STEP 3:
Adding the StandAlone Agent to Applicare
1. To start Applicare Server
- Go to the Aplicare server installed directory.
- Open a command prompt in "Administrator mode".
- Go to the path <ApplicareServerHomeDir>/server/bin.
- Execute the "startup.bat/sh" script file.
- For Windows execute "startup.bat" and for Linux execute "startup.sh" script file.
2. To start Agent
- Go to the Aplicare Agent installed directory.
- Open a command prompt in "Administrator mode".
- Go to the path <ApplicareAgentHomeDir>/server/bin.
- Execute the "startup.bat/sh" script file.
- For Windows execute "startup.bat" and for Linux execute "startup.sh" script file.
3. Login into the Applicare.
4. Go to the Overview screen.
5. Click the "Add Server" button.

6. Enter the Server IP and Port.

7. Check the "Add Database Configuration" checkbox and configure the Database details.

Oracle DB
1. Select "Oracle" option from the Database dropdown.
2. Select the needed Oracle version from the version dropdown.

3. Enter the JDBC URL
- Syntax: jdbc:oracle:thin:@[ip]:[port]:[database]
- Ex: jdbc:oracle:thin:@192.168.0.100:1521:xe
4. Enter the Username, Password and click "Test Connection" button. It will display the connection status.

5. If the Test connection is a success then click the "Apply" button to save the server.

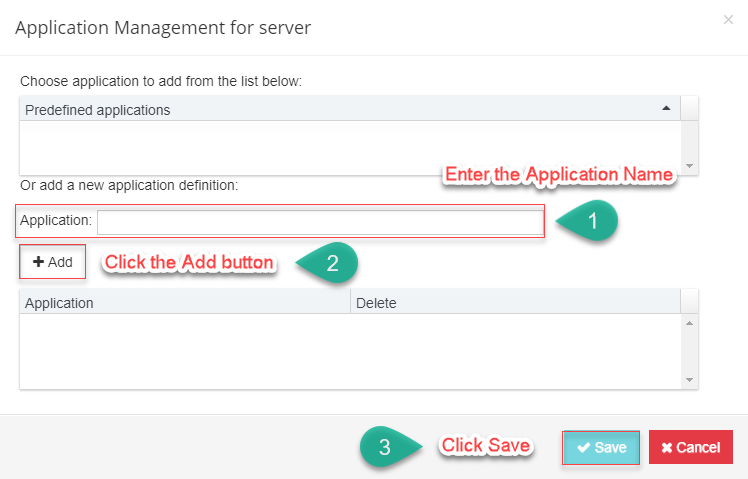
6. Add the Application name.

MySQL DB
1. Select "Mysql" option from the Database dropdown.
2. Select the needed Mysql version from the version dropdown.

3. Enter the JDBC URL
- Syntax: jdbc:mysql://[ip]:[port]/[database]
- Ex: jdbc:mysql://192.168.0.100:3306/jpetstore
4. Enter the Username, Password and click "Test Connection" button. It will display the connection status.

5. If the Test connection is a success then click the "Apply" button to save the server.

6. Add the Application name.
MSSQL DB
1. Select "SQL Server" option from the Database dropdown.
2. Select the needed SQL Server version from the version dropdown.

3. Enter the JDBC URL
- Syntax: jdbc:sqlserver://[serverName[instanceName][:portNumber]][;property=value[;property=value]]
- Ex: jdbc:sqlserver://192.168.0.100;databaseName=fuzzy
4. Enter the Username, Password and click "Test Connection" button. It will display the connection status.

5. If the Test connection is a success then click the "Apply" button to save the server.

6. Add the Application name.

Note:
1. By default it will capture all the SQL's under the specified connection string.
In order to restrict the SQL's capture to only specific databases add the database names in the "Custom Databases" text box. To do that
- Go to the overview screen.
- Select the agent row and click the edit button.
- Add the databases names in the custom databases text box and click the update button.

2. For every MSSQL Server agent two traces will be running for Applicare.
- SQL data gather (Maximum 512 MB)
- Deadlock data gather (Maximum 10 MB).
Once it reaches its maximum size it will reset itself. So it will not go beyond their maximum limit.
Steps to Modify the Trace file size:
1. Delete the agent from Applicare. The agent should be running at the time of delete.
2. Stop the agent and add the below JVM Args and start the agent.
To change the Deadlock Trace File size
-Dmssql_deadlock_tracefile_size=valueinMB
To change the SQL Trace File size
-Dmssql_tracefile_size=valueinMB
// 50 MB Trace file size is capable of holding 2,56,000 records approximately
Example for assigning 250 MB trace file size is -Dmssql_tracefile_size=250
PostgreSQL DB
1. Select "PostgreSQL" option from the Database dropdown.
2. Select the needed PostgreSQL version from the version dropdown.

3. Enter the JDBC URL
- Syntax: jdbc:postgresql://[ip]:[port]/[database]
- Ex: jdbc:postgresql://192.168.0.100:5433/person
4. Enter the Username, Password and click "Test Connection" button. It will display the connection status.

5. If the Test connection is a success then click the "Apply" button to save the server.

6. Add the Application name.

Note:
Delete Agent:
The agent should be running at the time of deleting the agent from Applicare.
Please sign in to leave a comment.
Comments
0 comments