
IBM HTTP server monitoring setup process

IBM HTTP server monitoring setup process
Step 1: Configuration needs to be done in the httpd.conf file. After applying the changes server restart is required.
Go to <IBMHTTPHomeDir>/conf and edit httpd.conf file and do the below specified changes
1. Check status_module is enabled, if not enable it by just removing '#’ before the
LoadModule status_module modules/mod_status.so

2. Please make sure the ExtendedStatus is On in the httpd.conf file as specified in the below image.

3. Search for <Location /server-status> and add the below commands inside the <Location /server-status> based on the Apache version.

4. Check log_config_module is enabled, if not enable it by just removing '#’ before the
LoadModule log_config_module modules/mod_log_config.so

5. Check unique_id_module is enabled, if not enable it by just removing '#’ before the
LoadModule unique_id_module modules/mod_unique_id.so

6. Check setenvif_module is enabled, if not enable it by just removing '#’ before the
LoadModule setenvif_module modules/mod_setenvif.so

7. Check headers_module is enabled, if not enable it by just removing '#’ before the
LoadModule headers_module modules/mod_headers.so

8. Create a new log folder inside the IBM http home directory.
For IBM Http version 8.5
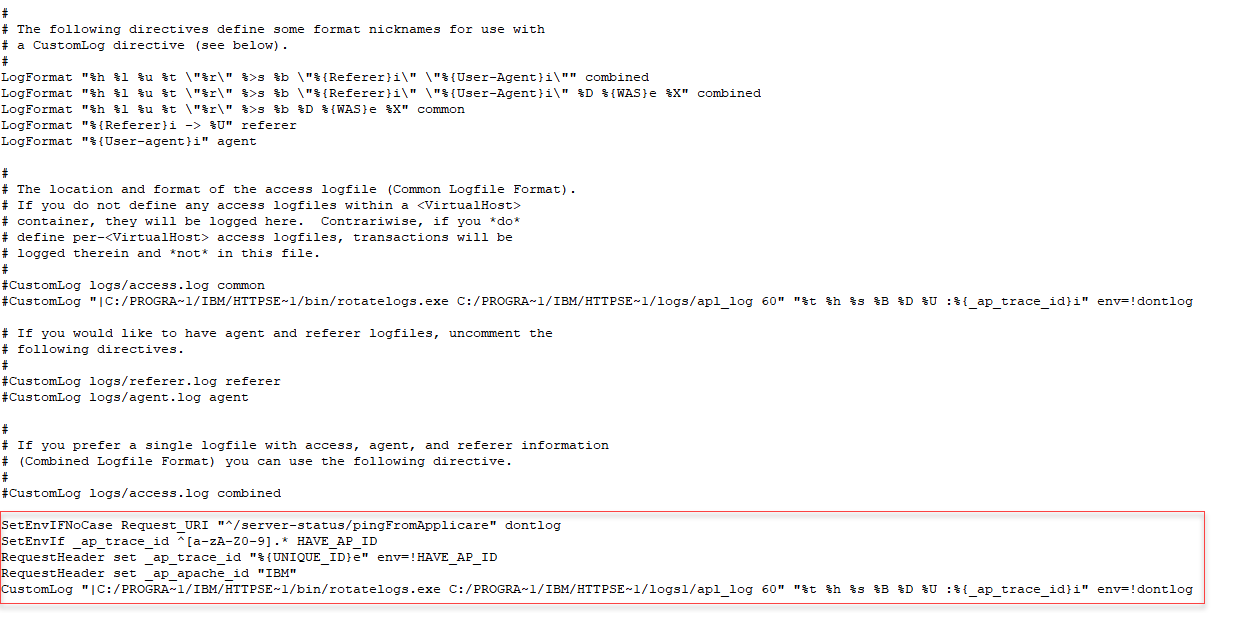
9. Search for "#CustomLog" and comment all the existing CustomLog and add the below lines after the last "#CustomLog" line in the httpd.conf file.
SetEnvIfNoCase Request_URI "^/server-status/pingFromApplicare" dontlog
SetEnvIf _ap_trace_id ^[a-zA-Z0-9].* HAVE_AP_ID
RequestHeader set _ap_trace_id "%{UNIQUE_ID}e" env=!HAVE_AP_ID
RequestHeader set _ap_apache_id "IBM"
After adding the above lines add the below line based on the OS.
For Windows :
- CustomLog "|<IBMHTTPHomeDir>/bin/rotatelogs.exe <IBMHTTPHomeDir>/newlogfolder/apl_log 60" "%t %h %s %B %D %U :%{_ap_trace_id}i" env=!dontlog
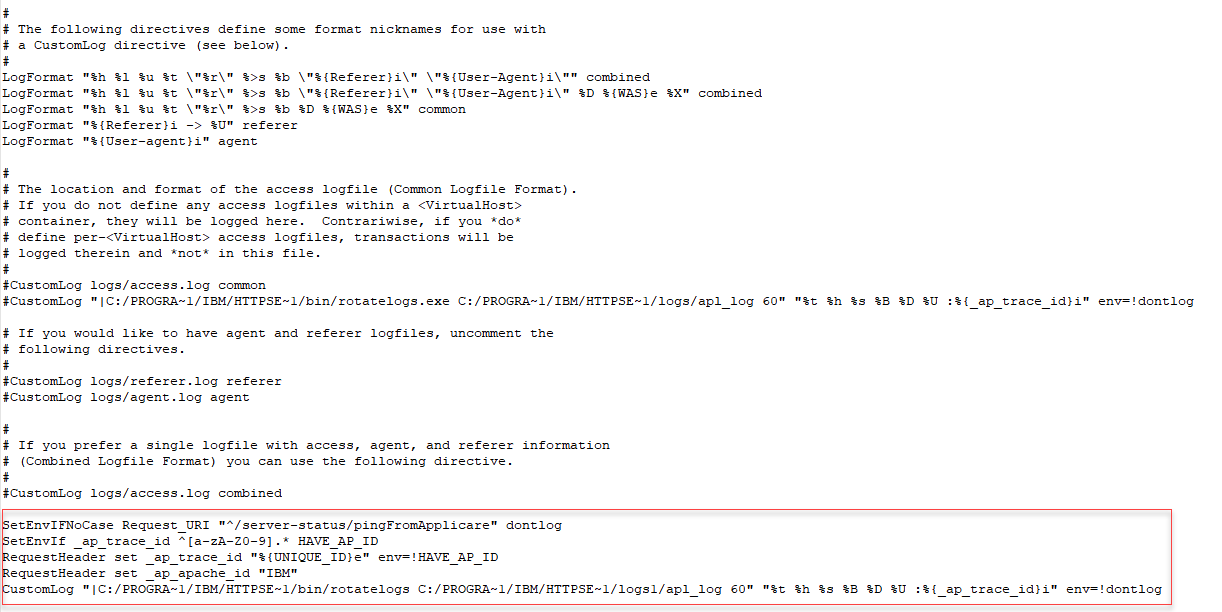
For Linux :
- CustomLog "|<IBMHTTPHomeDir>/bin/rotatelogs <IBMHTTPHomeDir>/newlogfolder/apl_log 60" "%t %h %s %B %D %U :%{_ap_trace_id}i" env=!dontlog
Note:
1. Replace the "<IBMHTTPHomeDir>" with your apache installed path (Need to remove the angle brackets also).
2. Replace the "IBM" with IBM servername (without space) and double quotes should be there. You can give any name in the IBM servername, But it should be unique.
3. Replace the newlogfolder with the folder name which you have created inside the IBM http home directory.
For Windows :
For Linux :
For IBM Http version 9.0 and above
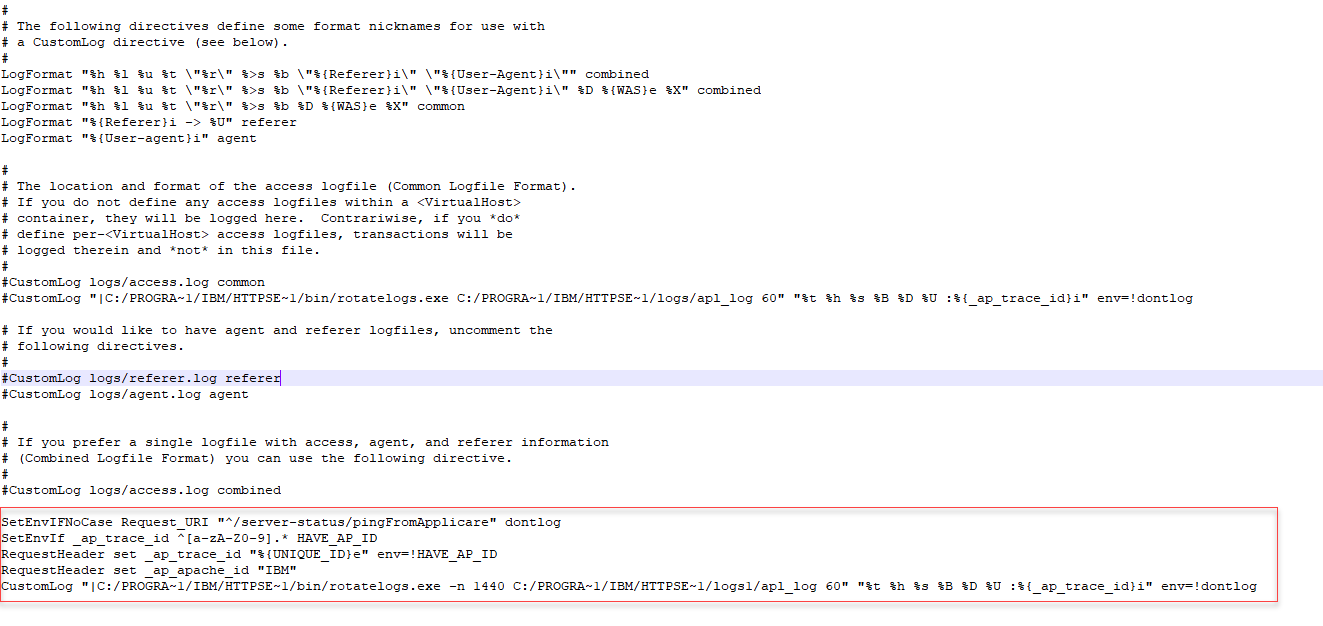
9. Search for "#CustomLog" and comment all the existing CustomLog and add the below lines after the last "#CustomLog" line in the httpd.conf file.
SetEnvIfNoCase Request_URI "^/server-status/pingFromApplicare" dontlog
SetEnvIf _ap_trace_id ^[a-zA-Z0-9].* HAVE_AP_ID
RequestHeader set _ap_trace_id "%{UNIQUE_ID}e" env=!HAVE_AP_ID
RequestHeader set _ap_apache_id "IBM"
For Windows :
- CustomLog "|<IBMHTTPHomeDir>/bin/rotatelogs.exe -n 1440 <IBMHTTPHomeDir>/newlogfolder/apl_log 60" "%t %h %s %B %D %U :%{_ap_trace_id}i" env=!dontlog
For Linux :
- CustomLog "|<IBMHTTPHomeDir>/bin/rotatelogs -n 1440 <IBMHTTPHomeDir>/newlogfolder/apl_log 60" "%t %h %s %B %D %U :%{_ap_trace_id}i" env=!dontlog
Note:
1. Replace the "<IBMHTTPHomeDir>" with your apache installed path (Need to remove the angle brackets also).
2. Replace the "IBM" with IBM servername (without space) and double quotes should be there. You can give any name in the IBM servername, But it should be unique.
3. Replace the newlogfolder with the folder name which you have created inside the IBM http home directory.
For Windows :
For Linux :

10. Restart Http server.
11. To check the configuration is working correctly enter the below line in the browser address bar and hit enter.
- URL: <hostaddress>:<portno>/server-status
Note: Replace the <hostaddress> with your Apache server IP address and <portno> with your Apache server port no.
- For Example: <hostaddress> is ‘localhost’ and <portno> is ‘81’
- URL: localhost:81/server-status
We can see the Apache details as below

Step 2: Steps to configure in Applicare.
1. First, you will have to build the stand-alone collector. Once you install Applicare you can build
the stand-alone agent by running
<ApplicareServer Install Dir>/agent/Standalonecollector/build/ build_collector.bat/sh

This will create a new folder
<Applicare Server Install Dir>/agent/Standalonecollector/Applicare
and jar file
<Applicare Install Dir>/agent/Standalonecollector/Applicare.jar

2. If you are going to deploy the agent in the new machine then copy the "Applicare.jar " from the Applicare server machine to agent machine and extract in any directory.
Please make sure that on Linux environment you assign appropriate read/write permission to extracted/copied Applicare folder/jar. Additionally, run the following command from the extracted/copied folder to assign execute permission to all the .sh script files.
chmod +x *.sh
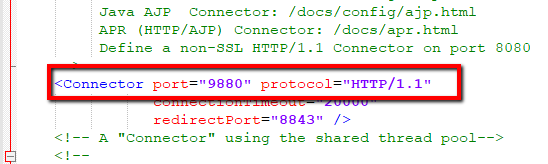
3. Please note that the agent by default runs on port 9880. You can change the port number by modifying
<ApplicareAgentHomeDir> /server/conf/server.xml file
4. Set "SERVER_NAME" and "JAVA_HOME" property in the agent "Catalina.bat/sh" file before starting the agent.
Go to the path <ApplicareAgentHomeDir>/server/bin/catalina.bat/sh
Edit Catalina.bat/sh and set the "SERVER_NAME" &
"JAVA_HOME" and save the file.
SERVER_NAME - You can give any name without spaces.
JAVA_HOME - Java JDK path of the Agent machine.
Note: For every agent, the SERVER_NAME should be unique.
For Windows edit Catalina.bat file and save

For Linux edit, Catalina.sh file and save

Running Applicare server and Agent:- (Run as Administrator)
To start Applicare Server:- (Run as Administrator)
1. Go to the Aplicare server installed directory.
2. Go to the path <ApplicareServerHomeDir>/server/bin.
3. Execute the "startup.bat/sh" script file. For Windows execute "startup.bat" and for Linux execute "startup.sh" script file.
To start Agent:- (Run as Administrator)
1. Go to the Aplicare Agent installed directory.
2. Go to the path <ApplicareAgentHomeDir>/server/bin.
3. Execute the "startup.bat" script file. For Windows execute "startup.bat" and for Linux execute "startup.sh" script file.
Adding the Agent in Applicare server:
If we are going to configure IBM with https protocol then please refer the below link and make sure the SSL certificate is imported correctly in java. Otherwise IBM http server will restrict to access the server-status details.
Configure IBM Http Server with SSL (HTTPS Protocol)
https://helpdesk.arcturustech.com/hc/en-us/community/posts/360049220692--Configuring-IBM-Http-server-with-SSL
For IBM Http version 8.5
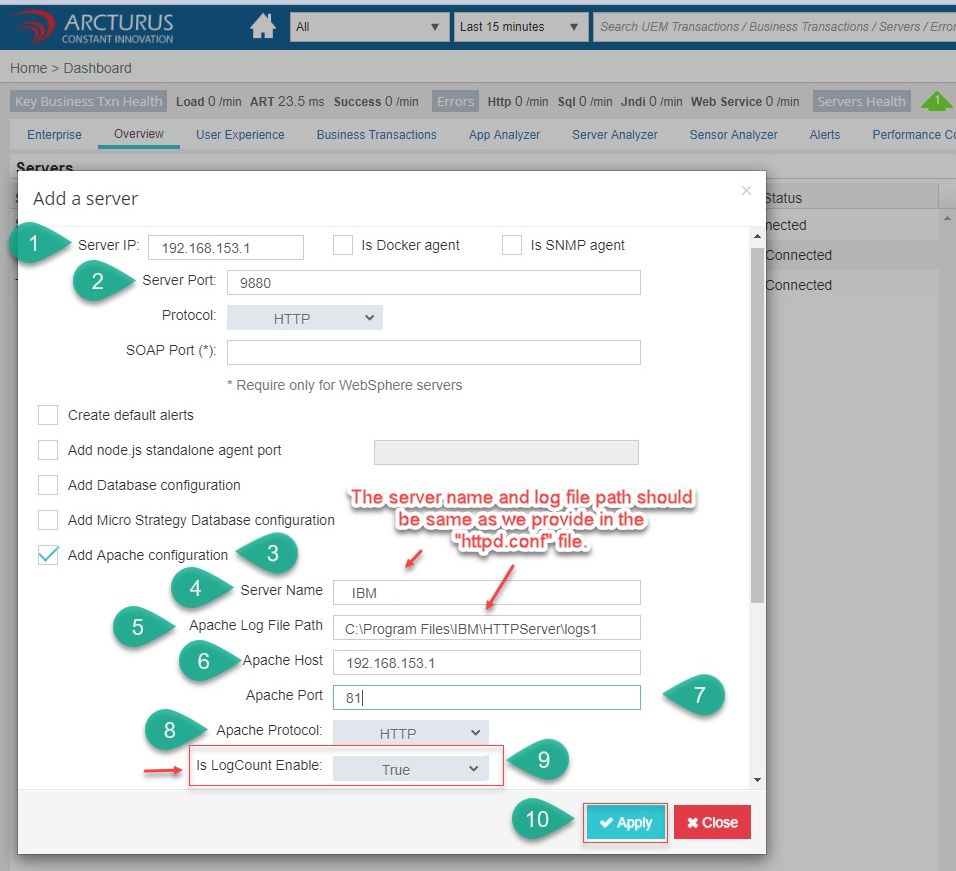
1. Open the overview screen in the Applicare console and click the “Add server” button to add the Standalone agent.

For IBM Http version 9.0 and above
2. Add the App name to the Standalone agent.

Enterprise

Apache

HTTP
Log consolidated HTTP data

Errors

Business Transactions
Top Business Transactions

Adding URL as KBT


Key Business Transactions Load

Key Business Transactions Load Distributions

Transactions

Enabling Apache User Experience Analyzer
By enabling this each and every individual transaction will be logged into the database as a separate one. So a huge amount of data will be logged into the database.
Please follow the below steps to add Apache User Experience Analyzer
1. Go to Menu and select Configure Dynamic Instrumentation.

2. Select the server and add "End User Experience Profiling" aspect to that server.

3. In the next few minutes, you can see the data in "Apache User Experience Analyzer".
Dashboard

Transactions

To Restrict only specific URL's to be logged in Apache User Experience Analyzer screen
1. Go to User Experience --> Settings (icon) --> UEM URL Exclusion/Inclusion

2. Add the URL's in the UEM Include and Exclude
UEM Include & Exclude
If the UEM Include list is not empty then only the URL's specified in that list will be logged.

Click "OK"

Note: After applying the changes Standalone Agent restart is required. So please add all the needed URL's in UEM Include, Exclude and apply the change and restart the Standalone Agent.
OS

CPU Cores

Processes

Disk

Network Connections

Mbean Browser

Please sign in to leave a comment.
Comments
0 comments