
IIS Monitoring with Applicare

Applicare Server and Agent
Ports Configuration
Applicare server - any port can be chosen for this at the time of install. This port should be accessible from outside. The default is 8880.
Applicare standalone agents (IIS Log monitoring) - any port can be chosen at the time of install. The default is 9880.
Applicare database server - Any open port can be chosen for either of these - MySQL (default 3306), Oracle (default 1521) or Derby (default 1527)
Communications
Applicare Server -> Applicare agent
Applicare Agent -> Applicare server
Applicare Agent -> Applicare Database (any port can be assigned to this)
Java Dependency
Java 1.8 for Applicare server and Java 1.6 or above for Applicare Agents.
Admin or root User access
All our agents on Windows should be run with Administrator privileges.
IIS Log Monitor Configuration
Please make sure the below settings are available in the IIS.
1. Go to Agent machine (i.e IIS machine) and in “Start” type “IIS” and select “Internet Information Services (IIS) Manager”.

2. Select the “IIS User” and double click the “Logging”.

3. Please make sure the below four settings are the same in the Logging window.
- One log file per -> Site
- Format -> W3C and Encoding ->UTF-8. The directory may contain any path.
- Log Event Destination -> Log file only
- Do not create new log files -> Should be unchecked

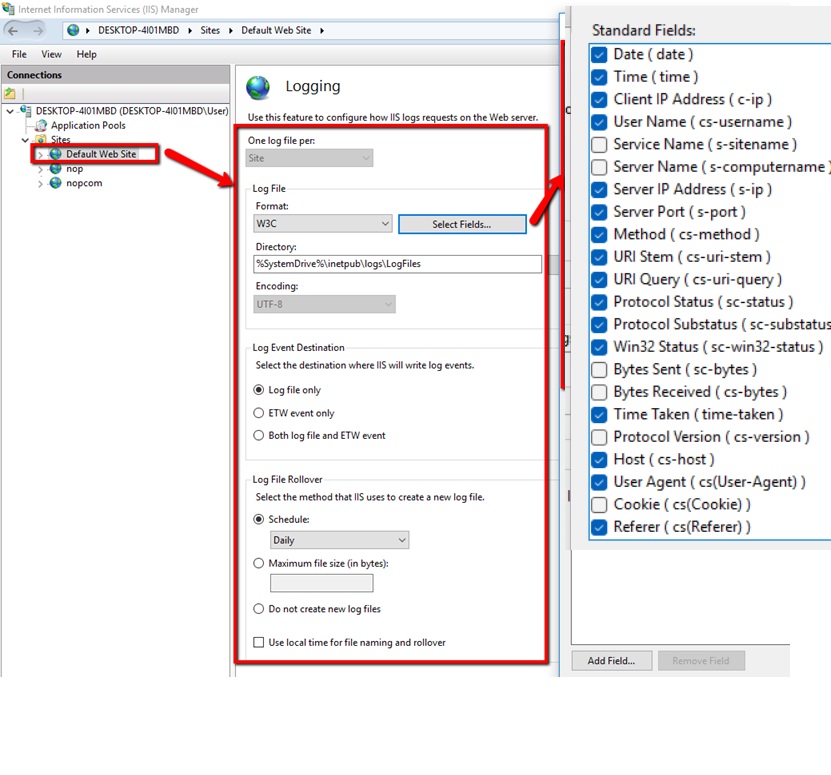
4. Please make sure the below specified W3C Logging Fields are enabled in the same format. Other than the below-enabled fields no other fields should be enabled.
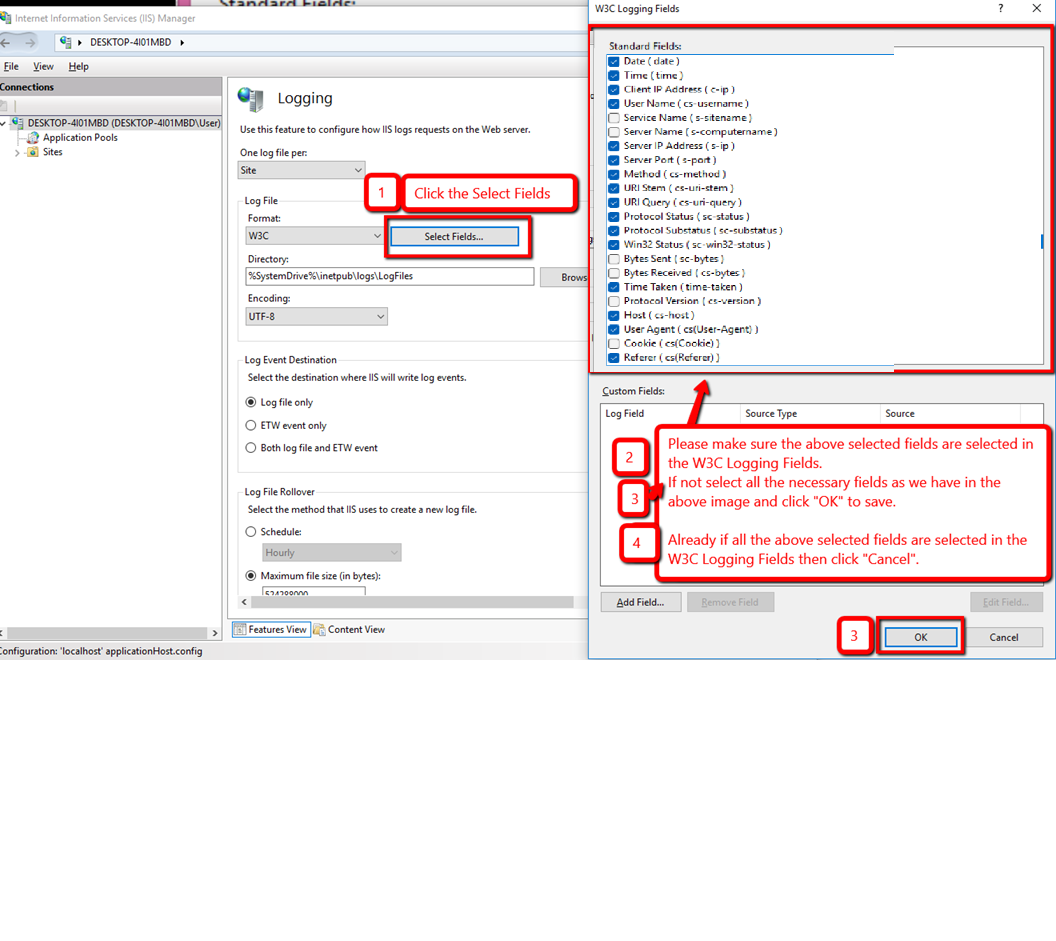
5. Likewise, all the sites should have the same Logging settings in the Logging window and W3C Logging fields.

6. Select the site and double click the Logging option and check the Logging and W3C Logging Fields for that site. Likewise check for other sites as well.
7. Please make sure all the above-specified settings are the same in the IIS.
If anything is different Apply the above-specified settings.
If there are no changes done in the Logging then close the (IIS) Manager window. If any changes made in the Logging then “Apply” the changes and restart the IIS.

8. To restart the IIS. (Needed only if we would have changed the settings).


9. Please make sure we have access to all the IIS Log folders and Log files for all the sites.
To view the IIS Log folder and files select the site and double click the Logging option and copy the path in the Directory field.
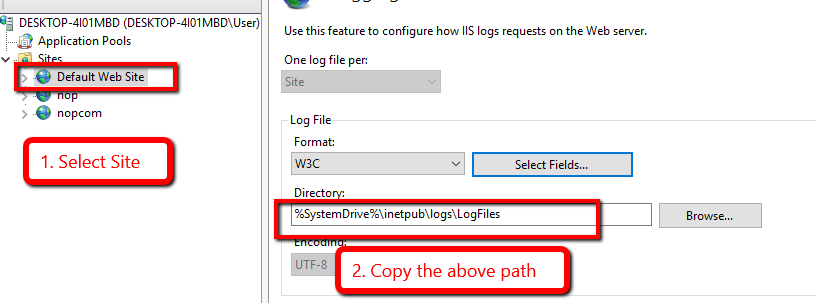
Note: Please make sure that Applicare Agent have access to all the folders and files in the above path.
For Example,
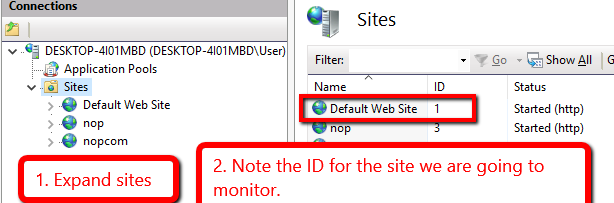
Let us consider that we are going to check for "Default Web Site".
Please execute the below steps and check whether we can able to view the log folder and log files of the "Default Web Site".
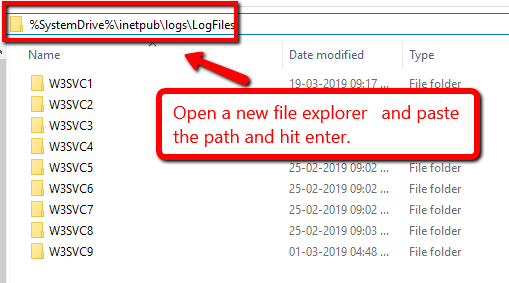
1. Go to IIS, expand the Sites and note down the ID for the site we are going to check.
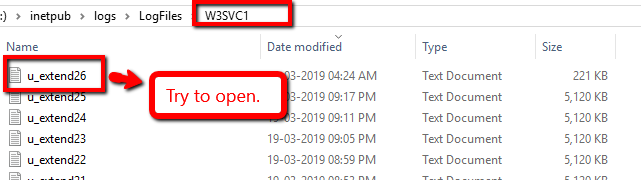
2. Go to the IIS Log folder path and open the "W3SVC1" folder (i.e "W3SVC" + "ID of the site". Here the Default Web Site id is "1". So we need to check the "W3SVC1" folder). Inside the folder please make sure that we have access to all the files.
First try to open the folder and files manually. While opening the folder and files if it asks for permission please provide the permission.
Installing Applicare Stand-alone Agent Application
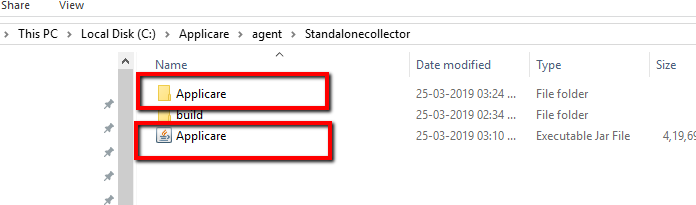
1. First, you will have to build the stand-alone collector. Once you install Applicare you can build
the stand-alone agent by running
<ApplicareServer Install Dir>/agent/Standalonecollector/build/ build_collector.bat

This will create a new folder,
<Applicare Server Install Dir>/agent/Standalonecollector/Applicare
and,
<Applicare Install Dir>/agent/Standalonecollector/Applicare.jar
2. If you are going to deploy the agent in the new machine then copy the "Applicare" folder or "Applicare.jar " from the Applicare server machine to Agent machine. If you copied the "Applicare.jar" file then create a folder named "Applicare" and extract the files in that directory.
3. Download the "data-importer.war" file from the below link and go to the "Applicare" folder directory in the agent machine and paste the "data-importer.war" file inside the webapps folder in the path "Applicare/server/webapps".
Link: https://s3.amazonaws.com/arc-temp/data-importer.war
From Applicare 757 and above use the below link
Link: https://arc-temp.s3.amazonaws.com/DataImporter_fromApplicare757/data-importer.war
4. Follow step 2 & 3 for other stand-alone agents.
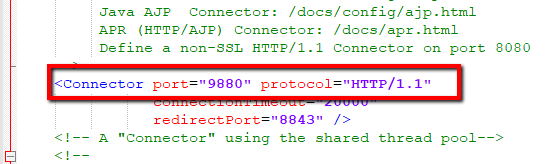
5. Please note that the agent by default runs on port 9880. If needed you can change the port number by
modifying the agent server.xml file.
Applicare /server/conf/server.xml
6. Set "SERVER_NAME" and "JAVA_HOME" property in the agent "Catalina.bat" file before starting the agent.
Go to the path Applicare/server/bin/catalina.bat
Edit Catalina.bat and set the "SERVER_NAME" &
"JAVA_HOME" and save the file.
SERVER_NAME - You can give any name without spaces.
JAVA_HOME - Java JDK path of the Agent machine.
Note: For every agent, the SERVER_NAME should be unique.

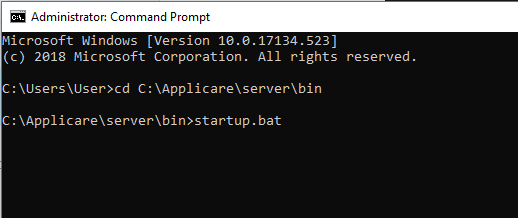
Running Applicare server and Agent:- (Run as Administrator)
To start Applicare Server:
1. Go to the Aplicare server installed directory.
2. Open a command prompt in "Administrator mode".
3. Go to the path <ApplicareServerHomeDir>/server/bin.
4. Execute the "startup.bat/sh" script file.
For Windows execute "startup.bat" and for Linux execute "startup.sh" script file.

To start Agent:
1. Go to the Aplicare Agent installed directory.
2. Open a command prompt in "Administrator mode".
3. Go to the path Applicare/server/bin.
4. Execute the "startup.bat" script file.


Adding the Agent in Applicare server:
1. Open the overview screen in the Applicare console and click the “Add server” button to add the agent.

Note: Please make sure that both the "IIS Logging Directory path" and the path specified in the "Add IIS Server Log Location" are same. Replace %SystemDrive% with the exact Directory.
For Example:
- Consider the IIS Logging Directory path is "%SystemDrive%\inetpub\logs\LogFiles".
- Copy "%SystemDrive%\inetpub\logs\LogFiles" path and open a file explorer and paste that path in the address bar and hit enter.

- It will specify the full path with the exact directory name.
- Now copy that path and add it in the "Add IIS Server Log Location".

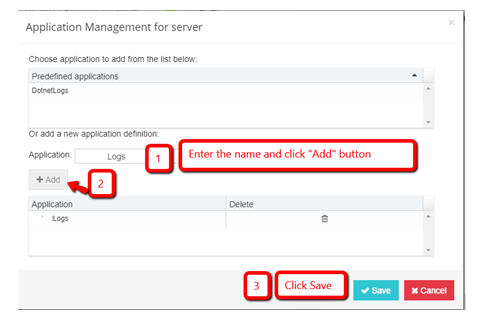
2. To add the app name to the Agent.
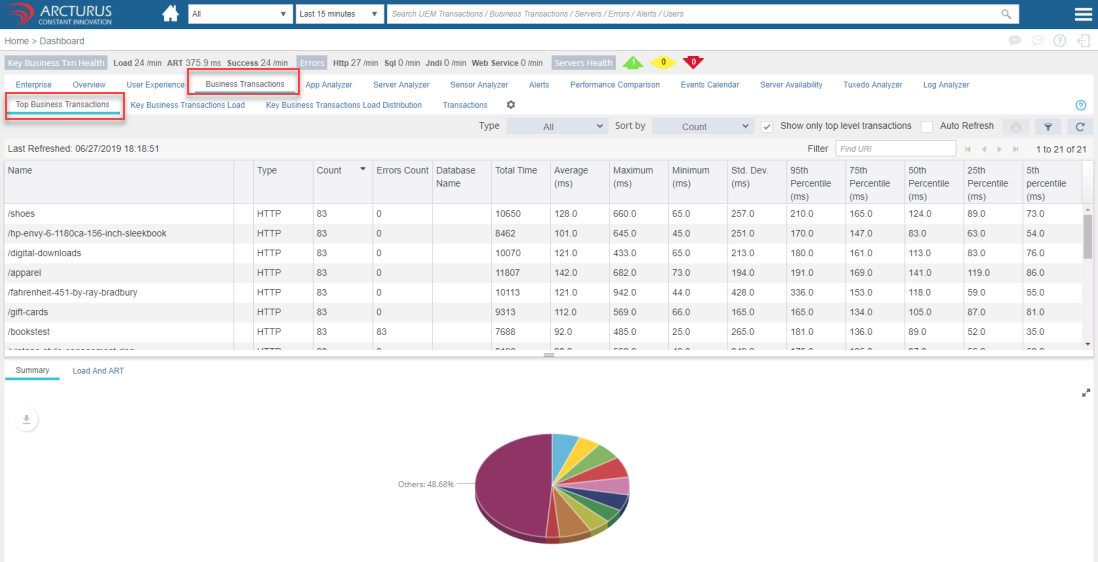
3. Business Transactions
Key Business Transactions allows you to capture performance statistics.
Top Business Transactions
Adding Business Transactions as KBT
Right click the row which we are going to add as "KBT" and select the "Add as Key Business Transaction" option.

Enter the "Name" and click "Save" button in the Add as Key Business Transactions popup.

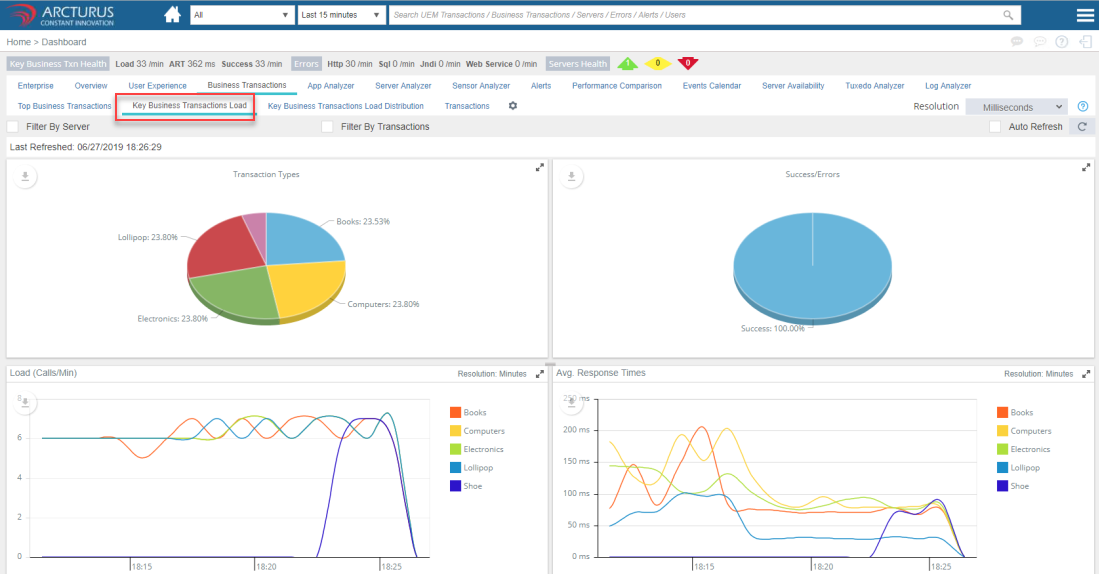
Key Business Transactions Load
Using the KBT tab you can view the performance stats of key business transactions across the environment as well as on a per server basis.
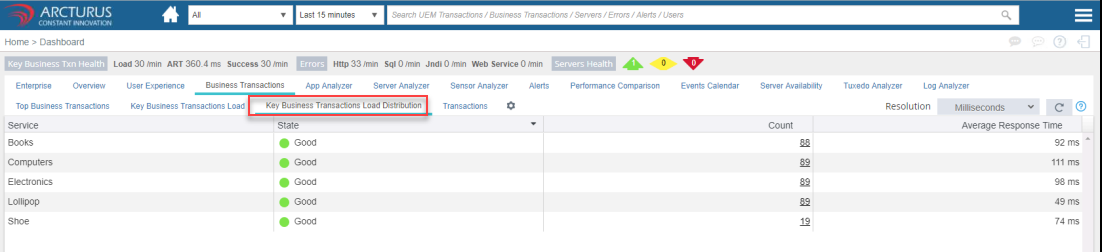
Key Business Transactions Load Distribution
It displays the state of Key Business Transactions across all servers in the domain.
Transaction
Transaction view displays individual transaction execution details.

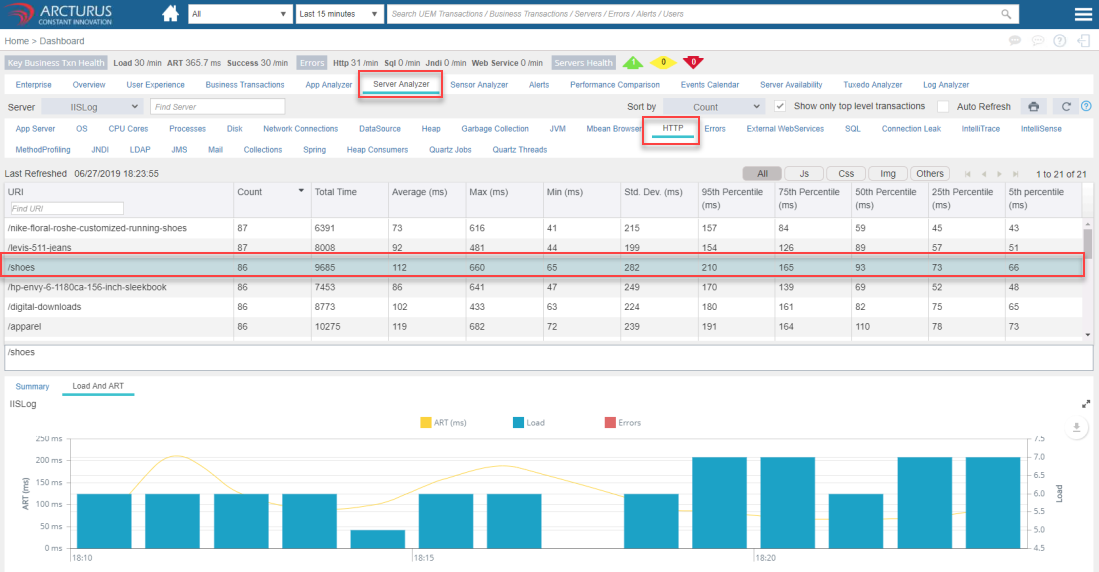
4. HTTP
HTTP Analyzer provides performance statistics on HTTP requests for the selected server.

By Selecting the particular transaction it will show when the calls came in, how many and how was the response time for that time.
5. HTTP Errors
HTTP Errors shows URI, failure time, http error code, exception and IP address where the call came from.

Note:
For debug add this JVM argument in the standalone agent and restart -Dapplicare.importerlog=true
Please sign in to leave a comment.
Comments
0 comments